http://www.geekonthepc.com/2012/01/23/configuring-anti-spam-spamassassin-in-ispconfig-3/
ISPConfig relies on SpamAssassin – which is, when configured correctly, a very powerful spam filter. But for some reason, it just wasn’t working on my installation of ISPConfig. Spam would get through and it can get seriously frustrating!
Thankfully I now have it cracked – and wanted to share the configuration I chose for ISPConfig and SpamAssassin. I think the correct settings vary from person to person – but if you want general spam filtering, this should show you how to get it.
Instructions
First of all, make sure a ‘spamfilter’ policy is active both for the email domain you’re using and for each email mailbox. I chose the Uncensored policy in my case – but different rules apply to each setting. I found Uncensored to be most effective, but simply choosing this won’t make it work properly.
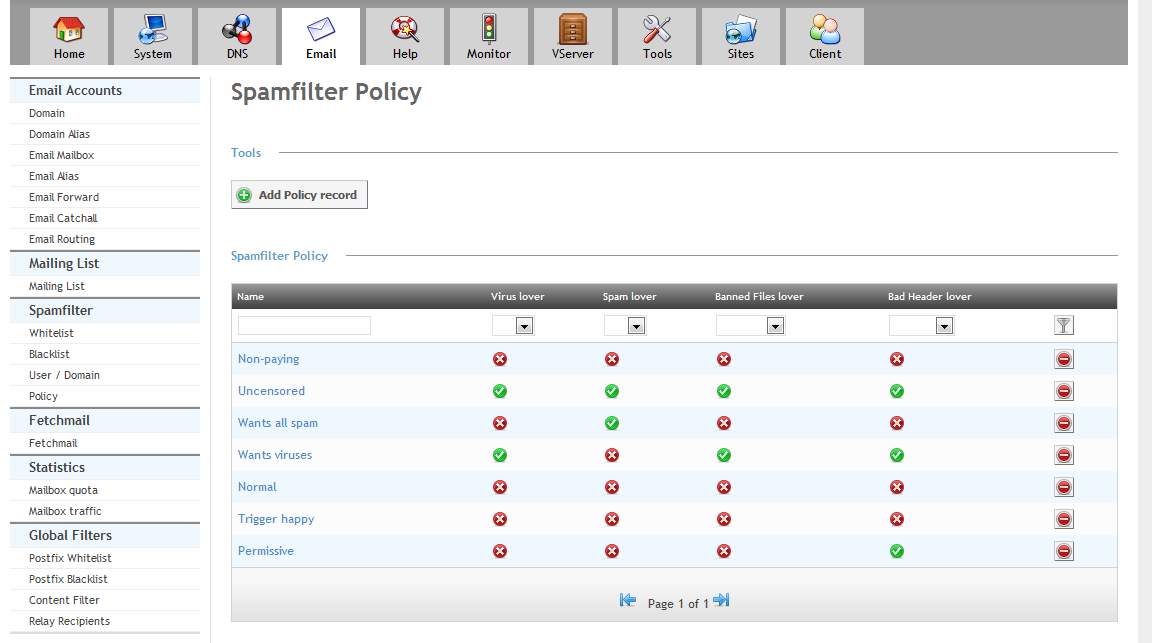
Once you’re happy that it’s supposedly on, you need to modify the rules for the policy you chose. Head to the ‘Email’ tab, and then from the left menu select ‘Policy’ under the ‘Spamfilter’ section (see screenshot that follows).
ISPConfig relies on SpamAssassin – which is, when configured correctly, a very powerful spam filter. But for some reason, it just wasn’t working on my installation of ISPConfig. Spam would get through and it can get seriously frustrating!
Thankfully I now have it cracked – and wanted to share the configuration I chose for ISPConfig and SpamAssassin. I think the correct settings vary from person to person – but if you want general spam filtering, this should show you how to get it.
Instructions
First of all, make sure a ‘spamfilter’ policy is active both for the email domain you’re using and for each email mailbox. I chose the Uncensored policy in my case – but different rules apply to each setting. I found Uncensored to be most effective, but simply choosing this won’t make it work properly.
Once you’re happy that it’s supposedly on, you need to modify the rules for the policy you chose. Head to the ‘Email’ tab, and then from the left menu select ‘Policy’ under the ‘Spamfilter’ section (see screenshot that follows).

Select the policy you’re working with by
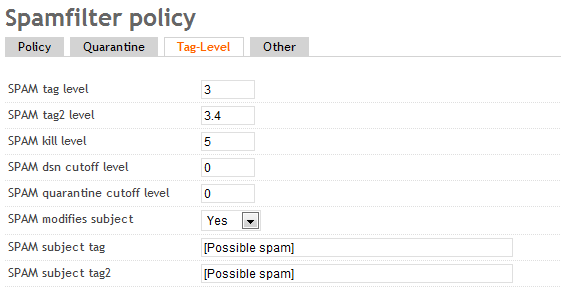
simply clicking on it. Then select the ‘Tag-Level’ tab. This is where
you set how sensitive SpamAssassin actually is. I found that the first
three settings needed to be set as the following:
SPAM tag level: 3
SPAM tag2 level: 3.4
SPAM kill level: 5
SPAM tag2 level: 3.4
SPAM kill level: 5
The other settings requiring a number can
be left alone. However, to make SPAM easier to separate, I’d suggest you
turn on ‘SPAM modifies subject’ and choose a tag you’d like to add to
SPAM emails. Here’s what the page might look like when you’re done (see
screenshot that follows).

Hit ‘Save’ and it’s a good’en. If you also
want to move SPAM email to a seperate Junk folder, you can do so by
going to the ‘Email Mailbox’ page from the left menu, then selecting
your email account and clicking the ‘Mail Filter’ tab. Simply tick the
‘Move Spam Emails to Junk directory’ checkbox and dodgy email will be
moved.
Hopefully that should get you going and stop infuriating SPAM emails reaching your inbox.

No comments:
Post a Comment